> ## Documentation Index
> Fetch the complete documentation index at: https://docs.fyvel.io/llms.txt
> Use this file to discover all available pages before exploring further.
# Mapping
> Assign categories to bookings — the main workspace
The Mapping page is the main workspace in Fyvel. Here you assign categories to bookings and build your metadata layer step by step.
### How mapping works
Every booking from your accounting data can be assigned a category. That assignment is the basis of management reporting: it decides which category and which reporting section a booking appears in.
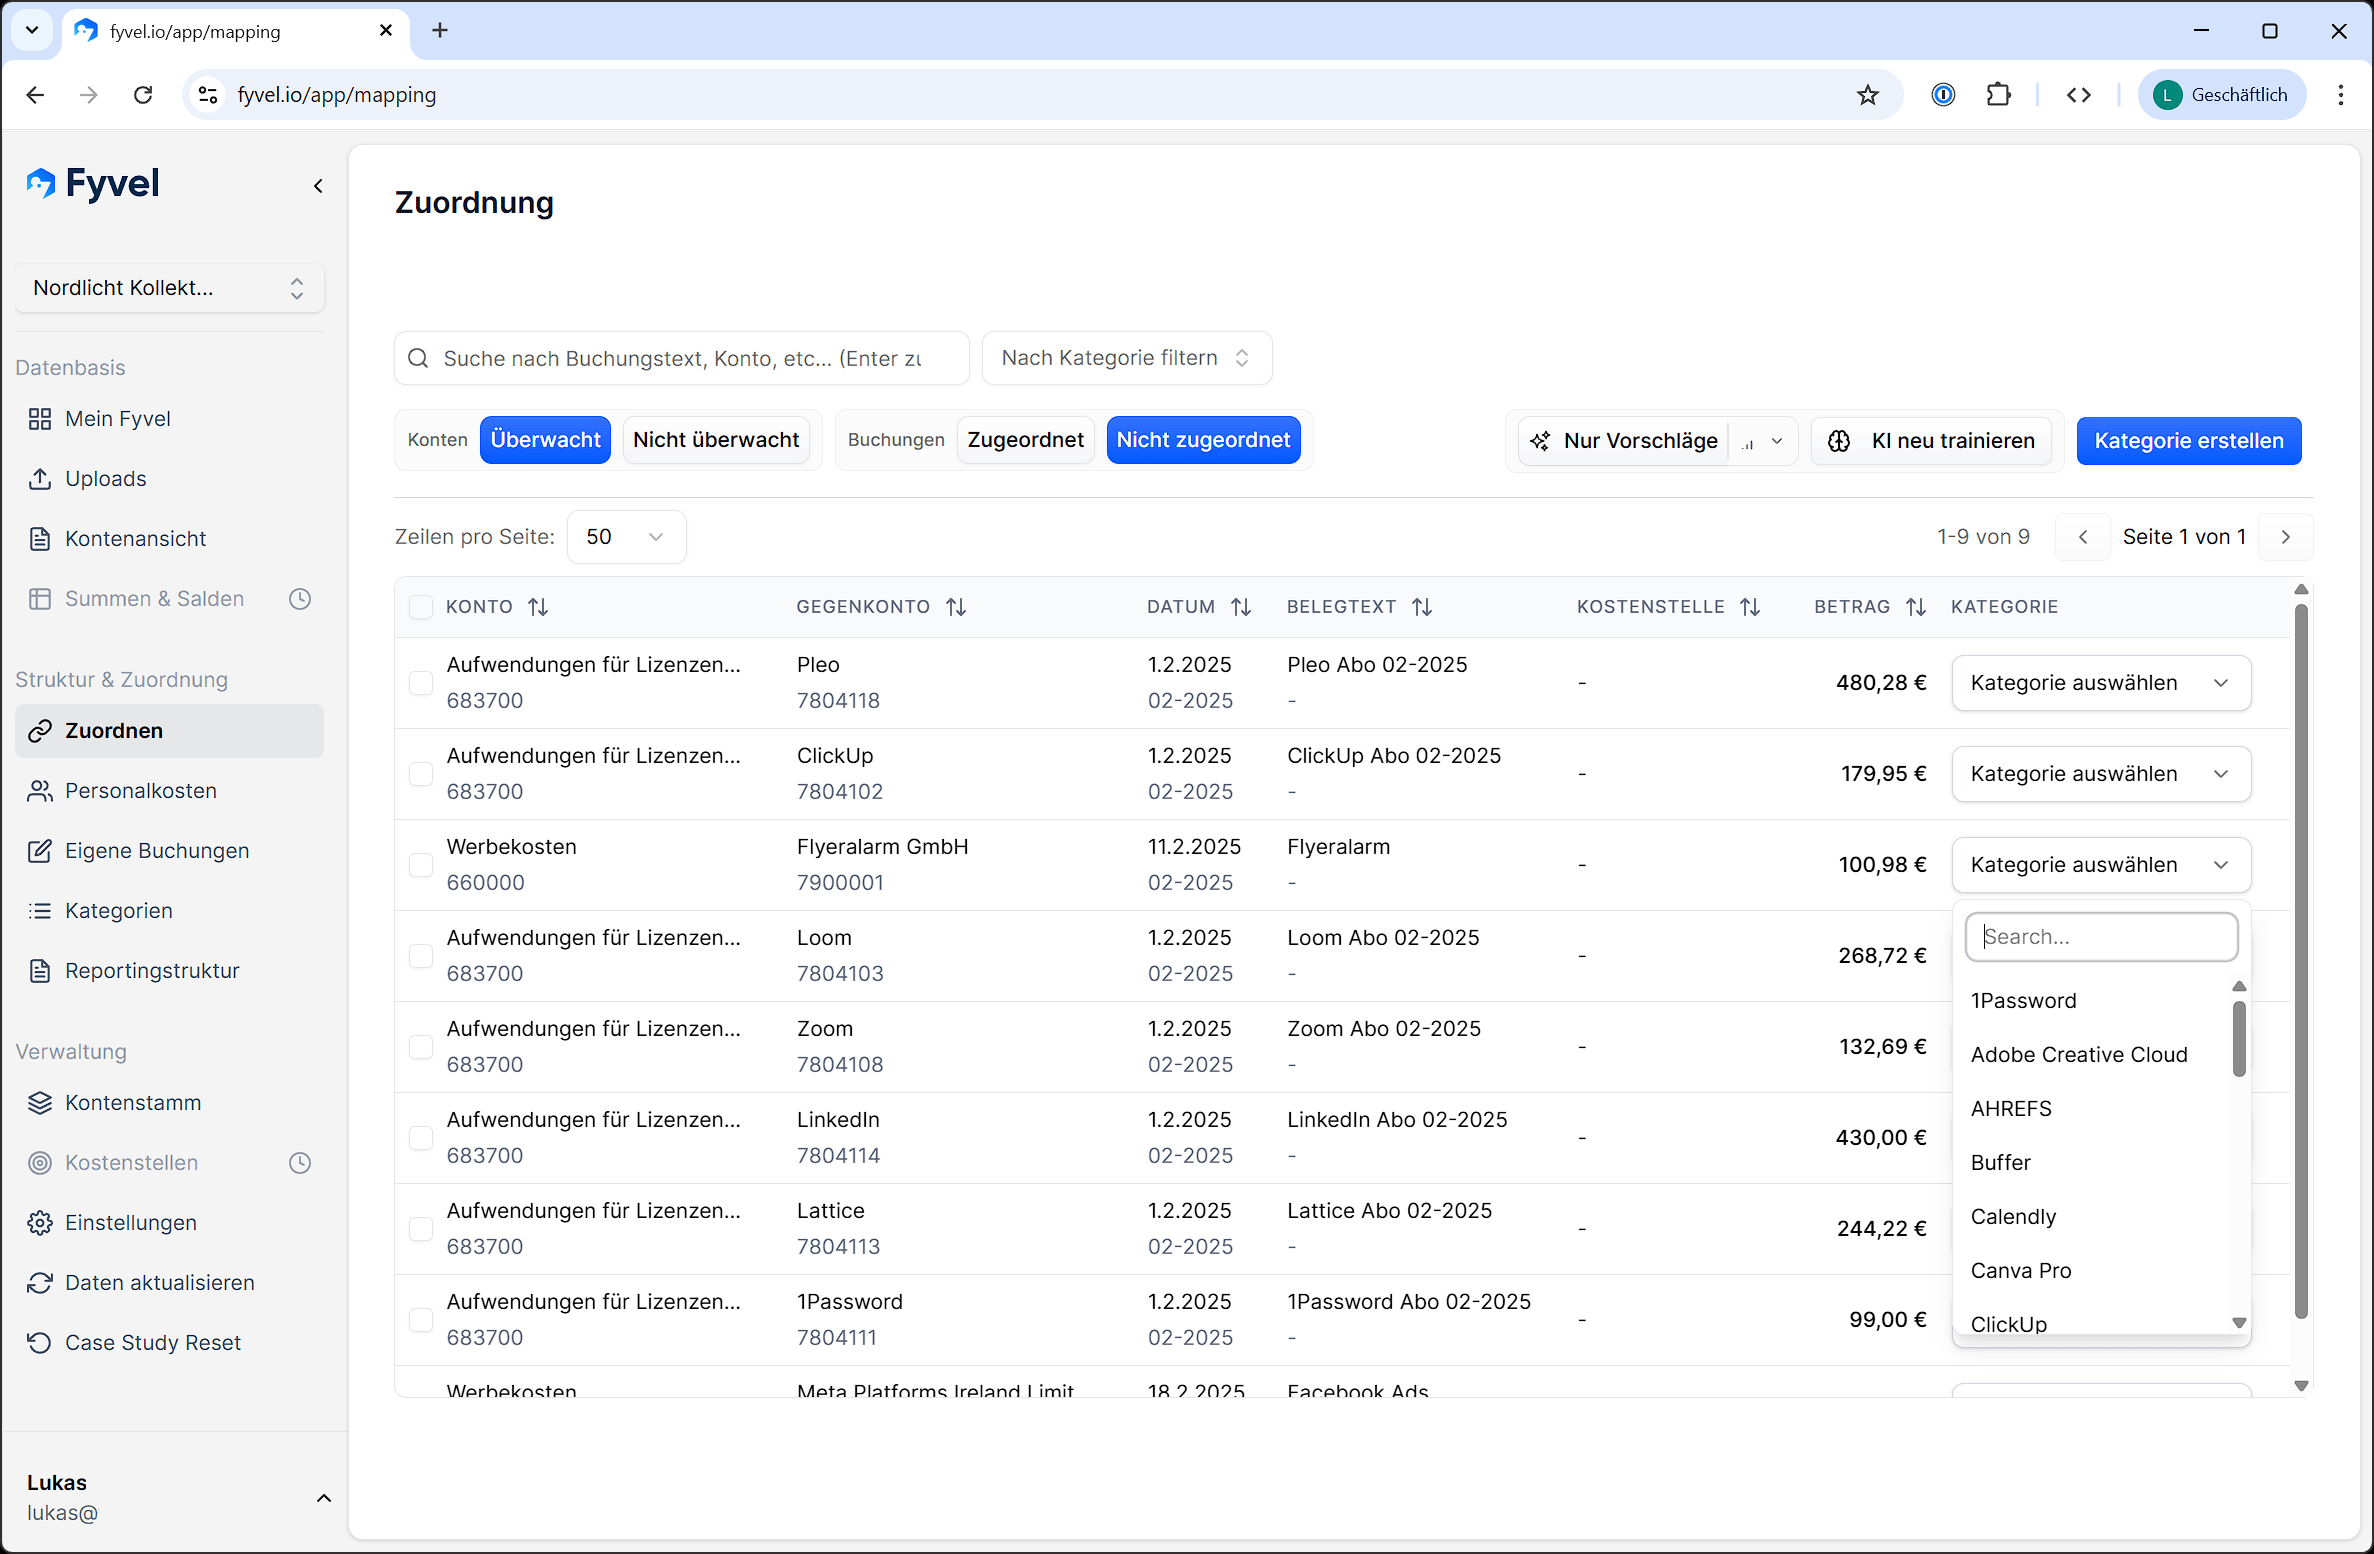 ### The table
For each booking you see:
| Column | Description |
| - | - |
| **Date** | Booking date |
| **Account and offset account** | The accounts involved |
| **Posting text** | The description of the booking |
| **Amount** | Debit or credit amount |
| **Category** | The current assignment (or a dropdown to choose one) |
Sortable columns are marked with small arrows. Click a column header to sort ascending. Click again to reverse the sort.
### Map a single booking
In the dropdown next to a booking, choose the matching category. The assignment is saved immediately. You can change or remove an assignment at any time.
**Ignore** is at the top of the dropdown when **Ignore bookings** is enabled in [Company settings](/en/documentation/export-and-settings/company-settings) (off by default). Ignored bookings leave the default view (unmapped) and stay in reports on the account — without a category. Assigning a category later clears ignore automatically. The X on the dropdown clears the assignment or the ignore. After training, the AI can suggest **Ignore** for similar open bookings — accept or decline it the same way as a category. Bookings that are already ignored stay ignored even if you turn the setting off later. You find them under **Mapped / ignored**.
### Map several bookings at once (bulk)
1. Select several bookings with the checkboxes.
2. In the bulk action bar, choose a category — or **Ignore** (when it is enabled).
3. Every selected booking is assigned that category, or ignored.
The X on the bulk selection clears the assignment or the ignore for every selected row.
This is especially efficient when many similar bookings exist (for example every rent payment of a year).
### Filters and search
#### Free-text search
Search posting text, account numbers, and other fields. Press Enter to run the search.
#### Account filter
* **Tracked accounts** (default) — shows only bookings on accounts marked as tracked.
* **Untracked accounts** — shows bookings on untracked accounts. These can be categorised too.
#### Mapping filter
* **Not mapped** (default) — shows only bookings without a category and without ignore. Use this to work through open assignments.
* **Mapped** — shows mapped bookings. When ignore is enabled in company settings, the filter is called **Mapped / ignored** and also includes ignored bookings.
#### Category filter
Filter by one or more categories to see which bookings are assigned there. When ignore is enabled, you can select **Ignored** here — together with **Mapped / ignored**, to see only ignored bookings.
A "Clear filters" button resets every filter.
### Create categories in place
You do not have to leave the Mapping page to create a category. Click "Create category", fill in the fields, and the new category is available in the dropdown immediately.
### Track progress
A badge in the sidebar shows how many bookings are still unmapped. You can see at a glance how much work is left.
***
This documentation is built and hosted on [Mintlify](https://mintlify.com), a developer documentation platform.
### The table
For each booking you see:
| Column | Description |
| - | - |
| **Date** | Booking date |
| **Account and offset account** | The accounts involved |
| **Posting text** | The description of the booking |
| **Amount** | Debit or credit amount |
| **Category** | The current assignment (or a dropdown to choose one) |
Sortable columns are marked with small arrows. Click a column header to sort ascending. Click again to reverse the sort.
### Map a single booking
In the dropdown next to a booking, choose the matching category. The assignment is saved immediately. You can change or remove an assignment at any time.
**Ignore** is at the top of the dropdown when **Ignore bookings** is enabled in [Company settings](/en/documentation/export-and-settings/company-settings) (off by default). Ignored bookings leave the default view (unmapped) and stay in reports on the account — without a category. Assigning a category later clears ignore automatically. The X on the dropdown clears the assignment or the ignore. After training, the AI can suggest **Ignore** for similar open bookings — accept or decline it the same way as a category. Bookings that are already ignored stay ignored even if you turn the setting off later. You find them under **Mapped / ignored**.
### Map several bookings at once (bulk)
1. Select several bookings with the checkboxes.
2. In the bulk action bar, choose a category — or **Ignore** (when it is enabled).
3. Every selected booking is assigned that category, or ignored.
The X on the bulk selection clears the assignment or the ignore for every selected row.
This is especially efficient when many similar bookings exist (for example every rent payment of a year).
### Filters and search
#### Free-text search
Search posting text, account numbers, and other fields. Press Enter to run the search.
#### Account filter
* **Tracked accounts** (default) — shows only bookings on accounts marked as tracked.
* **Untracked accounts** — shows bookings on untracked accounts. These can be categorised too.
#### Mapping filter
* **Not mapped** (default) — shows only bookings without a category and without ignore. Use this to work through open assignments.
* **Mapped** — shows mapped bookings. When ignore is enabled in company settings, the filter is called **Mapped / ignored** and also includes ignored bookings.
#### Category filter
Filter by one or more categories to see which bookings are assigned there. When ignore is enabled, you can select **Ignored** here — together with **Mapped / ignored**, to see only ignored bookings.
A "Clear filters" button resets every filter.
### Create categories in place
You do not have to leave the Mapping page to create a category. Click "Create category", fill in the fields, and the new category is available in the dropdown immediately.
### Track progress
A badge in the sidebar shows how many bookings are still unmapped. You can see at a glance how much work is left.
***
This documentation is built and hosted on [Mintlify](https://mintlify.com), a developer documentation platform.